Buying guide
How to Attach a Shade Sail to a House
As an Amazon Associate we earn from qualifying purchases. Our picks are researched from the manufacturers’ specifications and are our own editorial opinion.
On this page
To attach a sail shade to a house, fix each house-side corner to a structural part of the building, such as a rafter tail, wall stud or masonry wall, using a pad eye or eye bolt rated for the load. Do not hang it from a gutter or from the fascia board alone. Then join the sail to those points with stainless steel shackles and a turnbuckle, and tighten until the fabric is firm but not overstretched. Below we cover where you can and cannot fix a sail, the hardware you need, the steps in order, and what to do about vinyl siding, brick and posts.
Where You Can (and Can’t) Attach It
A shade sail pulls hard on every fixing point, and the pull gets worse in wind. That is why the first job is not choosing hardware, it is choosing what you bolt to. Coolaroo’s guide says all fixing points must be structurally sound, and This Old House says to use wall studs or roof rafters as mounting points, with heavy-duty anchors suited to your home’s construction to handle the wind load.
Good Fixing Points
- Rafter tails or roof trusses. These carry the roof load already, so they are the strongest point on most houses.
- Wall studs. Fix into the stud, not into sheathing or siding alone.
- Solid masonry. Brick, block or poured concrete with the correct masonry anchors.
- A fascia with a fascia support. See the next section.
- A purpose-built post. A steel or treated timber post set in a concrete footing is often the best answer for the far side of the sail, and sometimes for the house side too.
Points to Avoid
- Gutters. They are fixed to hold water, not to take a sideways load, and they will bend or tear away.
- A bare fascia board. It is thin trim, often fixed to the ends of the rafters with small nails. Coolaroo strongly recommends fixing to a fascia only with a fascia support, which reinforces the overhang of the rafters or trusses and transfers the load to the primary roof structure.
- Siding, soffits and window frames. None of these are structural.
- Rotten or unknown wood. Probe it first. If it is soft, repair it before you fix anything to it.
When to Call a Pro
Coolaroo says installation needs vary with soil, anchor points, wind and local planning rules, and recommends consulting a qualified builder or engineer and your local council before you start. This Old House also points readers to professional installation and local permits. If you cannot tell what is behind a wall, or the roof framing looks old or light, a short visit from a builder costs far less than a sail that pulls out in a storm.
Hardware Kit Explained
Many sails ship with only the fabric, or with a basic set of rings and clips. Check what is in the box before you buy anything extra. Coolaroo’s accessory list is a useful checklist, and every piece on it is stainless steel grade 316. That grade is chosen for outdoor use, since it resists rust better than plain zinc-plated parts.
The Parts and What They Do
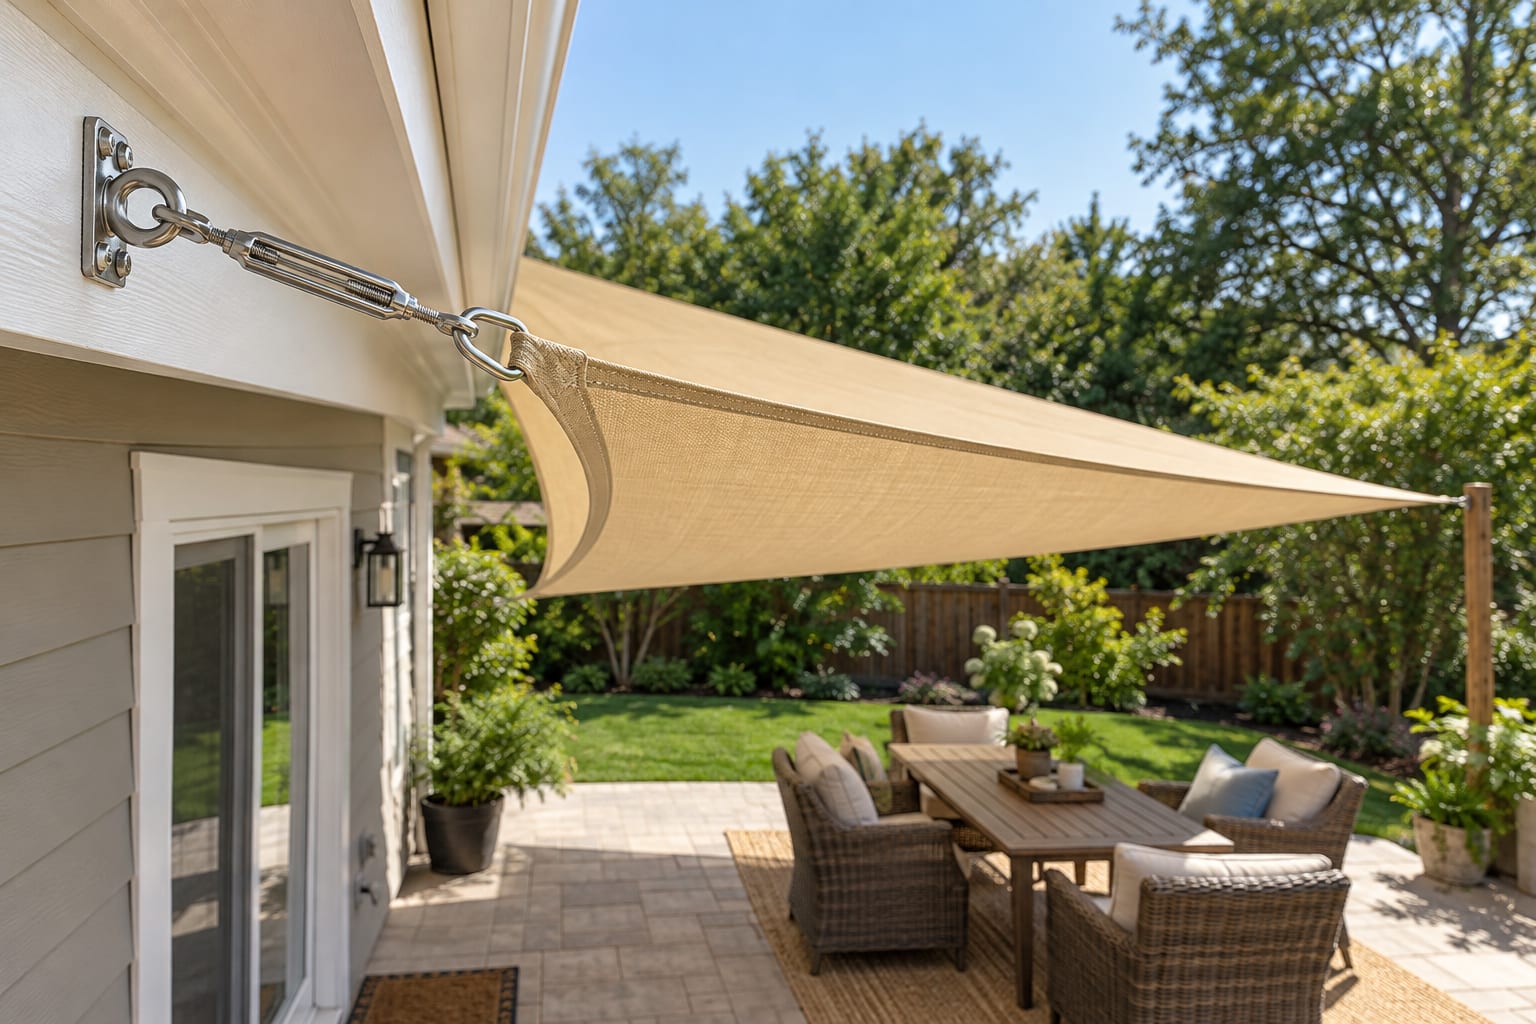
- Pad eye. A plate with a ring, screwed flat to a surface such as a post or beam. It is the usual choice for a wall or rafter fixing.
- Eye bolt. A bolt with a ring at one end, passed through a post or beam and locked with nuts and washers. This Old House uses eye bolts through the posts in its shade sail project and tightens a second nut against the first to lock them.
- Turnbuckle. A threaded barrel that lets you tighten the sail by turning it. Coolaroo says at least two of the sail’s fixing points should include one.
- D shackle. A closed link that joins the sail’s corner ring to the pad eye or turnbuckle.
- Snap hook, S hook or carabiner. Quick links for removing the sail for winter. Fine for light duty, but use shackles on the corners that take the most pull.
- Strap tensioner. Coolaroo sells a strap tensioning tool that helps draw the sail toward the post so the connection is easier to make.
Load Ratings
Do not rely on a size that merely looks strong. Every piece in the chain, from the eye bolt to the shackle to the sail’s corner ring, has a working load rating on the maker’s data sheet. The chain is only as strong as its weakest piece, so check the rating of each part against the sail size and the wind where you live.
Step by Step
These steps follow the Coolaroo installation guide and the This Old House projects, in the order that avoids mistakes.
1. Plan the Layout and the Slope
Lay the sail out on the ground where it will hang. Coolaroo recommends allowing an additional 10% of the sail length on each corner for accessories and fabric stretch, so the anchor points should sit further apart than the sail itself, not exactly at its corners.
Then plan the tilt. For water to run off, Coolaroo says the height difference between the low points and the high points should be at least 16% of the longest side. Its table gives 0.5 m for a 3 m longest side, 0.8 m for 5 m and 1.0 m for 6.5 m. In feet, that is roughly 1.6 feet for a 10 foot side, but check your own sail against the maker’s table. A flat sail pools water and sags.
2. Mark and Check the Fixing Points
Mark the house-side points at the higher end of the sail. Use a stud finder or look in the attic to locate the rafters or studs, and confirm by drilling a small pilot hole. Keep each point well away from the edge of the framing member so the wood cannot split.
3. Fix the High Points to the House
Drill pilot holes and fit the pad eyes or eye bolts. Where you are using the fascia, This Old House screws head rod clamps to the fascia at a spacing of 3 feet, slides the sail’s head rod into them and tightens the wing nuts. That is a different system to a corner-fixed sail, and a head rod sail is the one built for it. For a standard corner-fixed sail, follow Coolaroo and use a fascia support so the load reaches the roof structure.
4. Fix the Low Points
Set the posts, or choose the second wall, fence post or beam, and fit the hardware there. Coolaroo’s guide says to fit a turnbuckle to at least two of the sail’s fixing points. This Old House connects each corner ring to an eye bolt with a shackle.
5. Tension the Sail
Work with a helper, as This Old House notes that tensioning is a two-person job. Connect all the corners loosely, then tighten the turnbuckles a little at a time, alternating between corners. Coolaroo says to stop when the sail is rigid with little or no creases and does not sag, and to avoid over-tensioning because it puts unnecessary stress on the fabric and stitching. This Old House also recommends tightening a second nut against the first on eye bolts to lock them.
Inspect the sail regularly and re-tension as needed, as Coolaroo advises in its care instructions.
Vinyl Siding and Brick
The wall finish changes how you fix, not what you fix to. The load must reach the frame or the masonry behind it, whatever the wall is clad in.
Attaching to Vinyl Siding
Vinyl siding is cladding. It is thin, it flexes with temperature and it holds nothing. Never fasten a sail hardware plate to the siding alone. Find the stud behind it, drill through the siding into the stud, and use a lag bolt or eye bolt long enough to pass through the siding and sheathing and bite well into the wood. Drill the hole in the vinyl slightly oversized so the siding can expand and contract without cracking around the bolt, and seal the hole against water. If the high point is near the roofline, the better solution is usually to fix into the rafter tails or use a fascia support instead.
Attaching to Brick or Masonry
Solid brick, block or concrete is strong in the right place. Drill with a masonry bit into the brick itself, not into the mortar joint, then fit the type of anchor the hardware maker specifies for masonry, such as a sleeve or wedge anchor. Keep the hole well back from the edge or corner of a brick. Hollow block and old, crumbling mortar are weaker, so if the wall is not sound, use a post instead. The anchor’s pull-out rating is on its data sheet and should be compared with the sail’s load.
What If You Need a Post?
Most sails need at least one post, because the house rarely gives you every anchor point in the right place. The post is as important as the wall fixing, and it has to resist the full pull of the sail in wind.
How Deep Should the Post Footing Be?
It depends on the sail size and the post height, and the manufacturer sets the figure. In Coolaroo’s post table, the footing depth runs from 800 mm up to about 1,400 mm (roughly 32 to 55 inches) for the sizes it lists, with a footing 450 mm (about 18 inches) in diameter, and a taller fixing height needs a deeper footing and a thicker post. Take your sail’s size and height, and read the row in the maker’s own guide rather than copying a single number.
Setting the Post
Coolaroo’s method is to pour a 100 mm layer of concrete at the bottom of the hole as a solid pad, set the post, brace it and fill with concrete to the top of the hole, packed well. The posts tilt away from the sail’s center at about 10 degrees (1 in 10), so the pull of the tensioned sail brings them upright, and you should account for that tilt when you measure before digging. Allow the concrete to set before you tension the sail.
Can You Install a Shade Sail Without Posts?
Yes, if every corner has a structural fixing point. That can mean the house on one side and a pergola, a solid beam, a masonry wall or the roof edge on the other. It is common for a sail over a patio to use the house for two corners and posts for the other two. Remember that without posts, each point has to carry its share of the pull, so the same rules apply: fix into the frame and use the correct hardware. If you want shade without any anchoring, a freestanding option like a patio umbrella or a retractable awning may suit the space better.
What Is the Disadvantage of a Shade Sail?
The main drawbacks are wind, water and upkeep. A shade sail gives partial shade, not a roof, and it asks more of its fixings than most patio products do.
Wind Loads
A sail catches the wind like a flag, and the force goes straight into the fixing points. This is why This Old House says to use heavy-duty anchors suited to your home’s construction to handle wind load, and why Coolaroo tells you to check that every fixing point is structurally sound. In a storm, the safest move is to unclip the sail.
Water and Rain
Most sails are not made to keep a patio dry. A shade-cloth sail lets water through, and This Old House recommends a mesh fabric so water drains rather than pooling. A waterproof fabric can collect water, which is why the slope matters. If you want to sit outside in rain, consider a retractable awning instead (see our retractable awning guide).
Tension and Upkeep
Fabric stretches over time, so a sail needs re-tensioning. Coolaroo advises inspecting it regularly and re-tensioning to remove slack, and cleaning it with mild detergent and water. Many owners take the sail down for winter, which is easy if you used shackles or snap hooks at the corners.
How to Measure for a Sun Shade
Measure the distance between your fixing points, not the size of the area you want to cover. Subtract the allowance for hardware: Coolaroo recommends an extra 10% of the sail length on each corner for accessories and fabric stretch. Then check the height difference you can achieve between the high and low points against the 16% slope guide. Finally, stand outside at different times of day, since the shade moves. Our shade sail guide covers sizes and shapes.
Sources
- Coolaroo (Gale Pacific): Shade Sail Installation Guide, April 2026
- This Old House: How To Install a Shade Sail on a Deck
- This Old House: How to Install a Shade Sail
❓ Frequently Asked Questions
Looking for a sail to hang? See our best shade sails, the affordable shade sails, a retractable awning for rain cover, or a patio umbrella that needs no fixings.